Adding a shape in MyDraw is very easy - simply drag and drop any shape you like to add to your diagram from the library browser to the drawing area of MyDraw as shown in the following image:

Adding a shape in MyDraw is very easy - simply drag and drop any shape you like to add to your diagram from the library browser to the drawing area of MyDraw as shown in the following image:
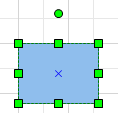
To select a shape either click it or click and hold somewhere outside of it and then drag it to trigger the rectangular selection tool and select it. When the shape is selected a set of trackers will appear around it as shown in the picture to the left.
To move a shape, select it and drag it across the drawing area until you reach the desired location.
To resize a shape, drag one of its corner trackers.
To rotate a shape, use the circular tracker above the shape. You can also use the buttons in the Rotate ribbon group of the Action tab from the ribbon.
When two or more shapes are selected MyDraw it becomes ambiguous on which shape some commands should work, for example the align lefts command. To visualize which shape will be used for such commands, MyDraw introduces two types of anchor shapes:
If a shape in multi-selection is both alignment and a format anchor, then its trackers are filled in white, i.e., the coloring of the format anchor takes precedence.
The following image shows how a selection with a different alignment and format anchor looks:
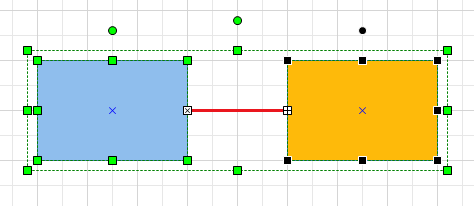
In this case, the red line is the format anchor, and the orange rectangle is the alignment anchor.
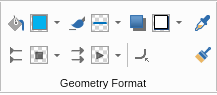
To change the appearance of a shape use the split buttons in the Geometry Format ribbon group of the Home tab. They will let you change the fill, stroke and shadow of a shape, as well as its corner rounding. If the selected shape is a 1D shape (i.e. a connector) you can also change its start and end arrowheads.
To pick the geometry formatting of the selected shape or the format anchor shape in case of multiple selected shapes, click the copy geometry formatting button (the rightmost pipette on the image below). Then select one or more shapes and click the apply geometry formatting button (the rightmost brush on the image below).
To add text to a shape, activate the Pointer tool (the one that looks like an arrow) and double click the shape or directly start typing. An in-place rich text editor for entering/modifying the text of the shape will open. You can use the buttons in the Font and Paragraph ribbon groups to format and style the text of the shape. Note that in text edit mode the text formatting ribbon commands act on the text selected in the rich text editor, but if you have simply selected the shape and you have not entered in text edit mode, the text formatting ribbon commands modify the formatting of the whole text of the shape.
When you have finished entering text press Escape from the clipboard or click outside of the shape to apply the text change. If you want to cancel the text change and revert to the previous text of the shape press Shift + Escape from the keyboard.
If you want to simply add some text to the page, then activate the Text tool (the one that looks like the letter "T"), click and hold somewhere in the page and drag to create a text area. Then double click this text area and enter your text.
If you want to format the whole text of a shape at once you can simply select the shape and use the controls in the Font and Paragraph ribbon groups.
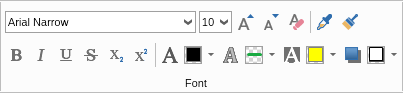
To format only parts of the shape's text, you should double click the shape in order to enter in in-place edit mode. You should then select the text you want to style and use the controls from the ribbon to apply the desired formatting to the selected text. You can then select another piece of the text and format it differently and so on.
You can use the copy (the pipette) and apply (the brush) text formatting buttons to copy the text formatting of a shape and then apply it to one or more shapes in the same way you do for shape geometry.