In This Topic
The drawing view is the main workspace area of MyDraw where the active drawing page is displayed. It is the area where you create, view, and edit diagrams by adding, arranging, and modifying shapes, connectors, text, and other drawing elements.
The drawing view provides various tools that help you work with precision, including optional rulers, a grid, and guidelines. These elements assist you in aligning and positioning shapes accurately. The drawing view also supports snapping to grids, rulers, and guidelines for easier shape placement.
Guidelines are horizontal or vertical alignment lines that help you position shapes relative to each other. You can create a guideline by dragging it from the horizontal or vertical ruler onto the drawing area. The guideline can be automatically centered on the page by using the Center in Page command, which is available from the drawing view context menu.
You can show or hide different elements of the drawing view and control its zoom behavior through the View tab of MyDraw's ribbon:

Show Ribbon Group
The Show ribbon group lets you toggle the visibility of various drawing elements, such as the grid, guidelines, ports, and rulers. The following image illustrates the elements that you can show or hide using the check boxes in the Show ribbon group:
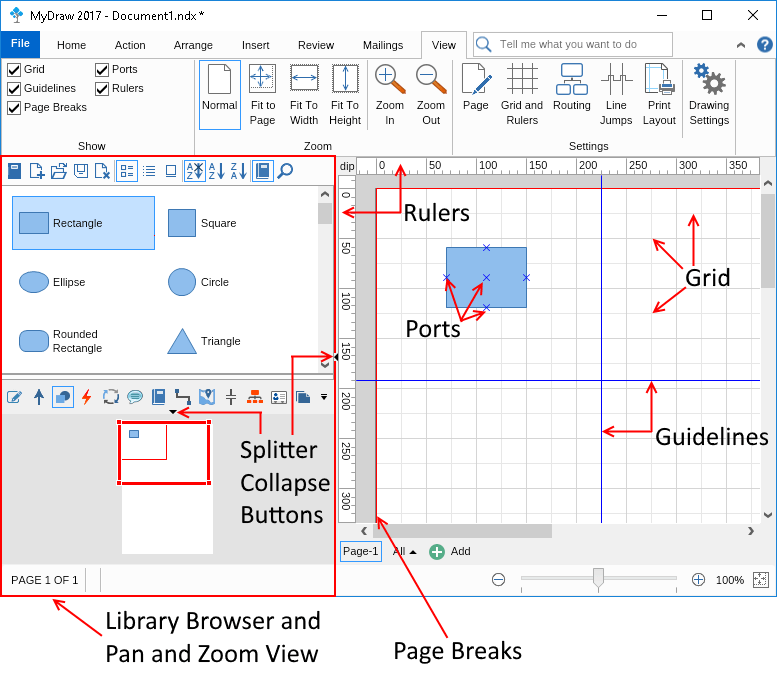
You can use the splitter collapse buttons to collapse and expand the splitter pane and the library. MyDraw saves these settings, so the splitter positions you configure will be restored the next time you start MyDraw.
Zoom Ribbon Group
The Zoom ribbon group lets you change the zoom mode of the drawing view to one of the following:
- Normal: the drawing view zoom factor is not automatically adjusted.
- Fit to Page: the drawing view is automatically zoomed in or out so that the entire page is visible in the available area.
- Fit to Width: the drawing view is zoomed so that the full width of the current page is visible.
- Fit to Height: the drawing view is zoomed so that the full height of the current page is visible.
You can use the Zoom In and Zoom Out buttons to change the zoom level of the drawing view. Alternatively, you can use the mouse wheel while holding the Ctrl keyboard key or use the following keyboard shortcuts:
- Zoom In: Ctrl + "+"
- Zoom Out: Ctrl + "-"
- Zoom to 100%: Ctrl + "0"
The keyboard shortcuts for zooming are identical to those used by most modern web browsers, making them easy to remember.
Settings Ribbon Group
The Settings ribbon group contains buttons that display dialogs for editing the properties of the objects and features they are associated with:
- Page: edits the properties of the active page. For more information, check out the Page Settings topic.
- Grid and Rulers: edits the properties of the grid and rulers.
- Routing: configures the routing manager and routing settings.
- Line Jumps: edits the line jump settings.
- Print Layout: edits the print layout settings.
- Drawing Settings: configures drawing view settings, such as selection appearance, whether to center the selection on zoom, copy/paste offsets, tracker appearance, and many other options.